WORKSHOP.
Scroll down for OIL & FILTER CHANGE; CHAIN ADJUSTMENT; VALVE ADJUSTMENT.
Oil Change & Filter Clean at 1000 kilometres
Read through these simple steps before changing the oil to familiarise yourself with the procedure and tools to use. Firstly, warm the engine and gearbox up to make the oil a little more free-flowing. Place the bike on a flat, even surface. Prepare all the tools and containers you will need for the oil change.
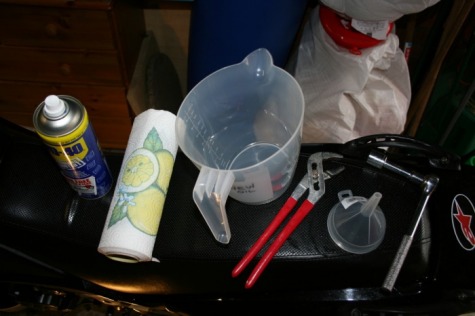
Stuff you will need are from left to right are:-
Stuff you will need are from left to right are:-
- WD 40 / Duck Oil or Cleaning Oil
- Paper Towels
- 2 Plastic Jugs that hold MORE than 1 litre
- Adjustable Wrench up to 24mm or 24mm Socket Spanner
- Small Funnel
- 17mm Socket Spanner
- One Litre of IPONE 10w40 SYNTHESIS (not pictured) or other suitable oil for a 4 stroke engine
- 45 Minutes of your time!!
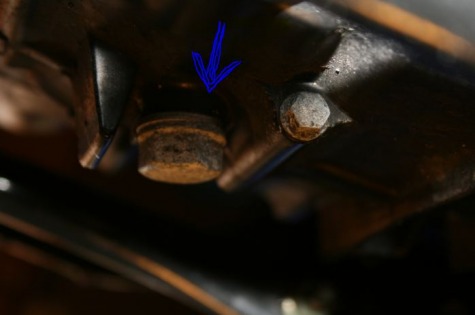
Locate Oil Sump Plug underneath engine block. Place a jug underneath to catch the oil. Using a 17mm socket spanner, undo the Oil Sump Plug anticlockwise, taking care not to burn your hands on the hot oil when the Oil Sump Plug is removed.
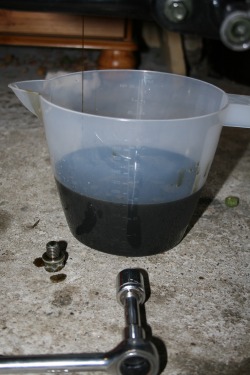
With one of the plastic jugs underneath the sump, you can now allow the oil to drain into it. Use one jug for dirty oil and any sedament, and use the other jug for clean oil. This stops any contamination of the clean oil!
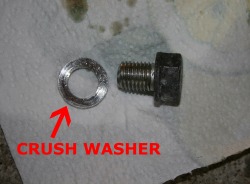
Take care not to lose the Crush Washer that must go back on the Sump Plug to avoid stripping the thread and helps seal the Plug to the engine! The Crush Washer tends to stick to the neck of the Sump Plug but should come away easily.
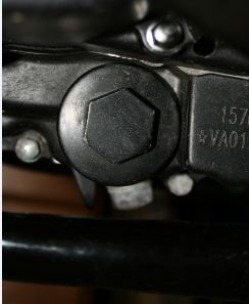
Locate Oil Filter Nut on left hand side of engine, behind the gear-shift lever. When the oil has drained from the sump, undo this Oil Filter Nut with an adjustable wrench or 24mm socket spanner. Undo anti-clockwise. Beware, there is a spring behind this nut, so ease off gently!
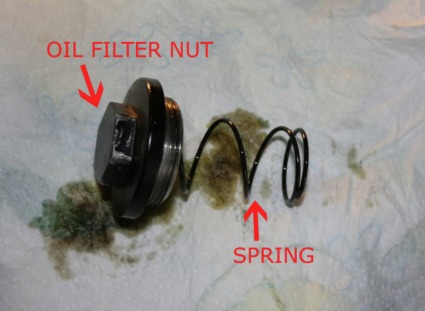
The spring sits behind the Nut and pushes up to the filter rim to hold it in place, so not too complicated to put back if it springs out at you!
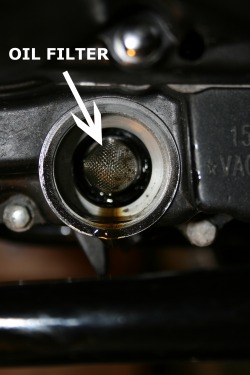
Once the Oil Filter Nut is off, locate the mesh Oil Filter and gently pull it out, taking care not to squash it!
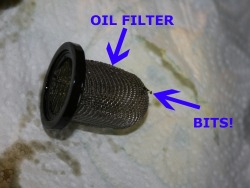
Clean the mesh Oil Filter with WD40 or similar to clean any debris from the mesh, again taking care not to crush or break the mesh. Clean the rubber seal around the Filter.
Leave the oil to drain over 30 minutes to ensure the oil has fully drained through the gears and crank inside the engine. After tilting the bike left and right to drain the last of the oil out of the sump, wipe the Sump Nut housing and Oil Filter housing with WD40 to remove any dirty oil.
Keep the dirty oil in its jug to check the amount of new oil going in is the same amount as the old oil that you have just drained.
Replace the Oil Filter in the housing, smearing a touch of oil around its rubber seal to help seal the Oil Filter to the housing. Make sure the hole in the filter goes to the INSIDE of the Oil Filter housing and the bit you can see sticking out is the dome of the mesh!!!
Place the spring on the back of the Oil Filter Nut and carefully push it over the now re-seated mesh Oil Filter making sure the spring sits at the mesh Oil Filters base inside the housing.
Screw the Oil Filter Nut back on turning clockwise, taking care not to over-tighten the nut. Once the Nut doesn't turn under normal hand tension, give it one quarter turn to tighten correctly.
This follows for the Sump Plug underneath. Make sure the Crush Washer is put on the Sump Plug before tightening it back up. If the Crush washer is exceptionally damaged or worn, replace with a new one.
Once the Sump Plug and Oil Filter Nut have been put back, then it's time to fill the engine with new oil.
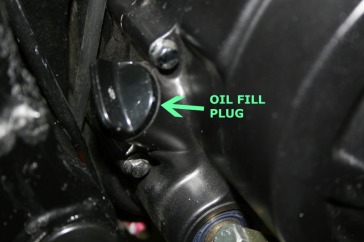
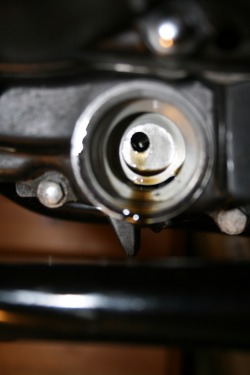
Locate the Oil Filler Plug at the top of the Kick-Start Lever. Unscrew anticlockwise and wipe any oil from Oil Filler Plug Stem.
Using the clean jug, fill with ONE LITRE of the replacement oil (In this case it's IPONE 10w40 SYNTHESIS). Check the level of oil you have just drained out is the same level as you are putting in. It should be a touch over ONE LITRE.
DO NOT OVERFILL!!!!! This could cause serious damaged to your engine.
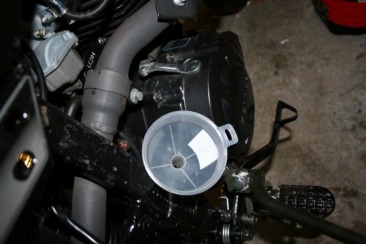
Using a small funnel, carefully pour the clean oil into the Oil Filler hole.
DO NOT OVERFILL!!!!! This could cause serious damaged to your engine.
Using a small funnel, carefully pour the clean oil into the Oil Filler hole.
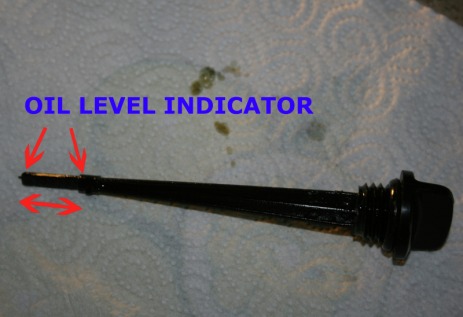
Once the ONE LITRE of oil has been put in the engine allow a further 10 minutes and then check the level using the Oil Filler Plug Stem that is also an oil level indicator.
Make sure the bike is LEVEL and not leant to one side on its stand.
Place the Oil Filler Plug back in its hole but don't screw it in. Pull the Oil Filler Plug back out and check the level of oil stuck to the bottom 10mm area of the stem. The oil should be between the area indicated on the pictue to the left. When the Oil level is correct - screw the Oil Filler Plug back into its housing, again taking care not to over-tighten.
Check for any leaks after replacing Oil Plugs and Nuts and tighten a bit more if any found. Check again after riding.
Summary of Oil & Filter Change.
This is quite a simple task to do that should save you a good £50 at a motorcycle dealership. HOWEVER, this should only be done by yourself if your bike has no warranty or service agreement, as i t could null & void your manufacturer's warranty.
This procedure should be done at regular intervals, by you or under warranty.
This is the same procedure to follow for every oil change. This should be done at 250k; 1000k and then every 2000k. The filter can be removed and cleaned every other oil change, but must be inspected for wear and tear.
As this is a mini service at 1000 kilometres, I also changed the spark plug. The spark plug recommended for this bike is a DR 8 EA or D 8 EA.
NOTE-
Always dispose of used oil safely - Your local Council will have disposal facilities at its Recycling depots or Waste Disposal depots. This will be disposed of correctly and free of charge. DO NOT pour it away down drains or dispose of in ordinary household waste.
CHAIN ADJUSTMENT
If you find your bike jerking after backing off the throttle when changing down gears, this is usually a good indication of a slack chain. It is crucial to keep a good tension on the chain to keep the engine running smoothly, so should be checked once a month. The chain will naturally slacken off with usual wear and tear.
Tools needed for CHAIN ADJUSTMENT:- 21mm Socket Spanner; 18mm Socket Spanner; 13mm Spanner and maybe a second person to help!
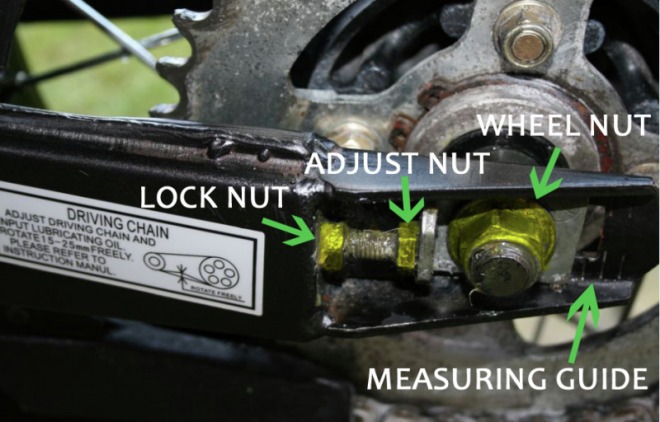
Firstly, undo the wheel nut by turning anti-clockwise on the chain side by using a 21mm Socket Spanner, This will require a bit of force and may need some one to hold the non chain side wheel nut to stop it just spinning round! The non chain side nut is 18mm. Once the wheel nut has undone, simply undo the lock nut anti-clockwise (pictured) and then turn the Adjust Nut (pictured) clockwise using a 13mm Spanner until the chain is able to move up and down 15 - 25mm where indicated (see label in picture).
When correct tension is achieved repeat the same adjustment on the non chain side - making sure the marked line indicators to the right (left side on non chain side) of the adjusting plate are equal on both sides.
Tighten lock nuts on both sides and then tighten the Wheel Nut. Smear a little grease on the exposed thread and thats job done! Always check Wheel Nut again after riding for tightness.
Tools needed for CHAIN ADJUSTMENT:- 21mm Socket Spanner; 18mm Socket Spanner; 13mm Spanner and maybe a second person to help!
Firstly, undo the wheel nut by turning anti-clockwise on the chain side by using a 21mm Socket Spanner, This will require a bit of force and may need some one to hold the non chain side wheel nut to stop it just spinning round! The non chain side nut is 18mm. Once the wheel nut has undone, simply undo the lock nut anti-clockwise (pictured) and then turn the Adjust Nut (pictured) clockwise using a 13mm Spanner until the chain is able to move up and down 15 - 25mm where indicated (see label in picture).
When correct tension is achieved repeat the same adjustment on the non chain side - making sure the marked line indicators to the right (left side on non chain side) of the adjusting plate are equal on both sides.
Tighten lock nuts on both sides and then tighten the Wheel Nut. Smear a little grease on the exposed thread and thats job done! Always check Wheel Nut again after riding for tightness.
VALVE ADJUSTMENT
New valves will change their clearances while they run in so check every 4000 km (2500 miles), or when the engine tone significantly changes to a more 'tappety' noise - a good indication that the valve clearances have changed. When the engine has run in, you will find they do not need adjusting so often, but as it's a Chinese copy of a CG125 engine, I would still check every 4000 km (2500 miles)! Other symptons of badly adjusted valve clearances can be a backfiring when throttling down, meaning there's still fuel igniting when leaving the exhaust valve. Valve clearances normally increase due to mechanical wear, but can sometimes decrease.
Always make sure you have all the tools available to you before commencing valve adjustment! A feeler gague is an essential item for checking clearances - these can be bought from the internet at all good tools stockists or from local motor supermarkets such as Halfords.
IT IS ESSENTIAL THAT THIS ADJUSTMENT IS DONE WHEN THE ENGINE IS COLD - SO SHOULD BE LEFT OVERNIGHT BEFORE ATTEMPTING THIS.
Valves will expand when hot and therefore cannot be accurately adjusted until cold.
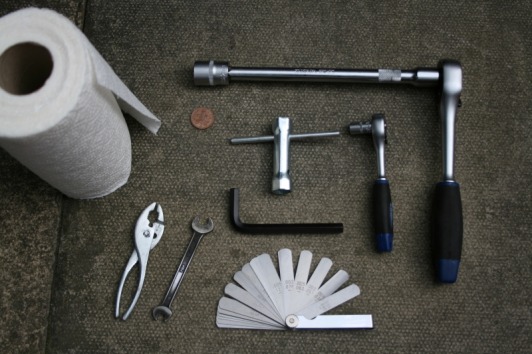
Tools required before commencing valve clearance adjustment:
10mm allen key (hex key)
2 pence coin (a quarter coin/ 2 centime coin)
spark plug tool
10mm socket spanner or 10mm spanner
14mm socket spanner
feeler gague with 0.05mm - 0.08mm range
pliers
kitchen roll
10mm allen key (hex key)
2 pence coin (a quarter coin/ 2 centime coin)
spark plug tool
10mm socket spanner or 10mm spanner
14mm socket spanner
feeler gague with 0.05mm - 0.08mm range
pliers
kitchen roll

Firstly, unscrew the access cover on the magneto case on the gear lever side of the engine. Using a 10mm allen key, unscrew anticlockwise. Once removed you will see a 14mm bolt inside - this we will come back to.
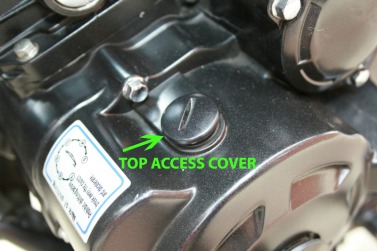
Now unscrew the top access cover from the magneto case to reveal the marks to line up top dead centre of the piston - enabling correct adjustment of the valves. Use a 2 pence coin to unscrew this anticlockwise.
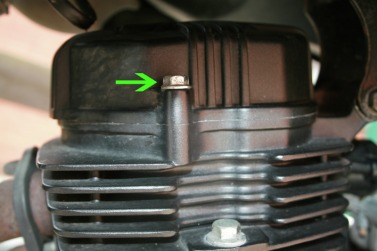
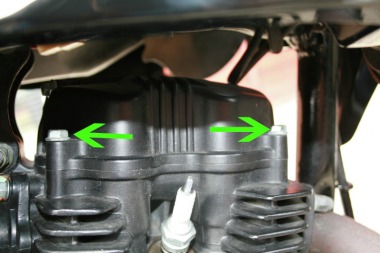
Using a 10mm socket spanner or 10mm spanner, undo the three bolts holding the valve cover on to the top of the engine. There are two bolts on the spark plug side and one bolt on the other side.
After undoing the three bolts, loosen the spark plug to help release compression when we attempt to manually turn the engine round in a moment.
Carefully tap the top cover to loosen it from the rest of the engine and manouvre out by lifting above the valves inside and lifting out sideways on the spark plug side (this is the easiest way to remove the cover away from the bike) Once removed, carefully place the cover on a clean stable surface checking that the rubber seal around the inside of the cover is still in place in the groove and is in good condition.
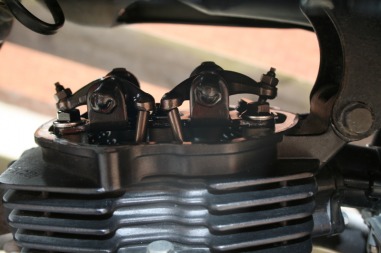
Now back to the engine revealing the valves and tappets.
Now back to the engine revealing the valves and tappets.
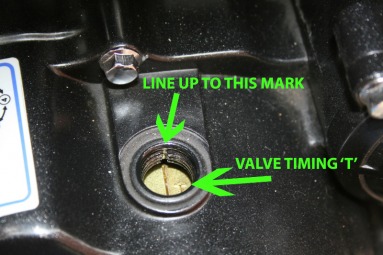
Using a 14mm socket spanner, go back to the Magneto cover and place socket spanner inside to locate the socket you will need to turn to line up the Top Dead Centre mark to the indicator mark shown in the picture. The engine must be turned ANTICLOCKWISE until the line marked with a 'T' lines up the line on the inside of the screw housing as in picture.
Ignore any other marks, letters or lines when lining up - only the line with the 'T' must be visible for valve timing adjustment.
Ignore any other marks, letters or lines when lining up - only the line with the 'T' must be visible for valve timing adjustment.
Once the 'T' line is lined up correctly go to the valves and tappets on top of the engine and check they move up and down by pulling them. When correctly position both valves will move up and down by hand. If there is no movement, turn the engine ANTICLOCKWISE again until lined up correctly with the 'T' line and try to move the valve/tappets again and check they can be manually moved up and down. This means the engine is in the correct stroke for adjustment.
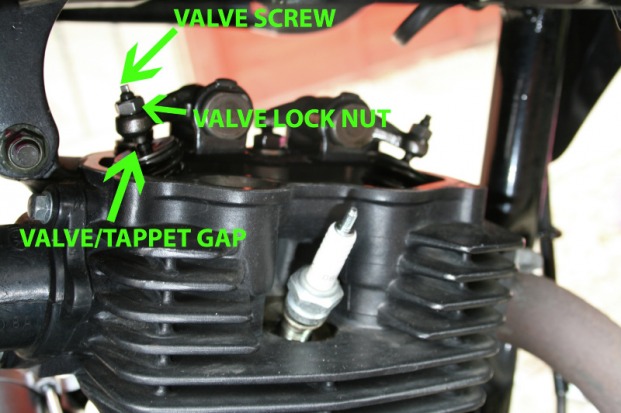
Before undoing anything, lift either of the valves up and place the feeler gague set at 0.08mm between the tappet gap. The valve clearance is the small gap between the round metal rods. If there is slight resistance then no adjustment need be made. However, the tolerances for this engine is between 0.05mm and 0.08mm so the best setting would be 0.07mm.
If you find the valves need to be adjusted, it's worth trying to turn the engine round with the 14mm socket spanner a few times and re-aligning to the 'T' mark, to see if the gap is correct, there's always a slight variation every time you turn the engine over.
To adjust a valve, loosen the nut (10mm) on the valve you wish to adjust, use the pliers or your fingers to turn the top of the Valve Screw thread until the clearance is at the correct setting, checking the feeler gague pulls slightly out of the gap, then re-tighten the lock nut. Recheck Valve/Tappet clearance after retightening the nut, if its gone out, loosen nut again and readjust.
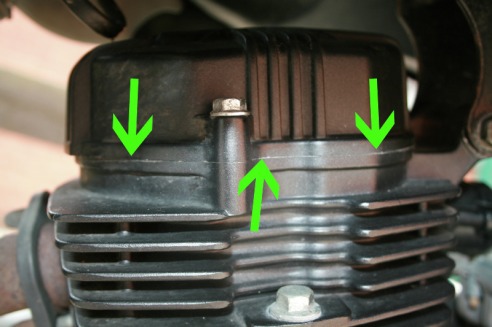
Once the settings have been done, carefully replace the valve cover back on, taking care not to damage or trap the rubber seal on its underside. Replace the three 10mm bolts and tighten, making sure they are all tightened evenly before a final tight nip to make sure the rubber seal has sealed the engine. Inspect the joint of the cover and engine, there should be no gap visible.
Replace both Magneto covers and re-fit spark plug.
Now start the engine and check there are no strange noises. The engine should now be slightly less noisy now the correct valve adjustment has been done, but remember these valve gaps do open up ever so slightly when the engine warms up so will always make a slight tappety noise.
Check round the cover/engine joint for any oil leaks. It is normal for a little oil to leak out as there is usually some inside the groove where the rubber seal sits, that works its way out after the cover is tightened back on. Wipe any oil away and check again the following day of use for any more leaks. If it still leaks, nip the bolts up a touch more and keep checking. If leaks persist after a couple of rides - replace the rubber seal. The part should be available from a Honda dealer as the engine is a Honda CG125 clone.
If the valves need re-adjusting - leave overnight to cool down and repeat the above.
